Did you ever wish you could capture part of a webpage or show someone something that is happening on your computer? Lots of my clients take a picture with their phone and send to me. But there is a tool built right into Windows for taking pictures of what is on your screen, and it is called the Snipping Tool.
Here’s a good use case to get you thinking about how to use it:
Imagine that you are on your favorite stock website and you want to capture the stock history graph shown about Tesla’s price/volume (I like Telsa, What can I say) . All you have to do is open the Snipping Tool, and you can click and drag to select the area you want to capture.
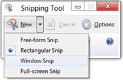
The Snipping Tool allows you to capture an area by drawing a freeform area or using a Rectangle Area Tool where you just click and drag to capture the area you are wanting. You can also just grab the entire browser window. All you need to do is Open the Snipping Tool and click the little arrow new to the NEW icon.
Even better, once you have the capture, you can add notes to it, draw on it, and use a digital highlighter, in edit mode. Once you are done with whatever notes you want to make on it, you can save it. That way you have an image on your computer that shows what you saw.
To open the snipping tool all you need to do is hit the Windows key on your keyboard, then type Snipping Tool. Then click on it to open it.
The Windows Key is two keys to the left of your space bar. and looks like this: 
Try doing a snips today, and soon you will say the same thing my wife said when I told her I was writing about it. She said; “Oh, I love the snipping Tool!”
If you are a Mac user, there is a much more robust tool built into macOS that I use on a daily basis. I would be happy to tell you about it. Just give me a shout.